it doesn't have to be complicated...
But, being the person I am, I chose to make it so. I am making my way through Earthbag Building by Kaki Hunter and Donald Kiffemeyer, a book which I will continue to praise throughout this website, and in it there are basic instructions for designing your dome using a ruler, graph paper, and a compass. Basically, you make a scaled line that represents the length of your dome's diameter at the floor. Mark the middle of that line, and on either side you have your radius length (which is one half the length of the diameter). Take one half of your radius (a quarter of your diameter), and on both sides of the first line, add that quarter-diameter distance. It gets confusing with all the halves and diameters and radii; it is much more fun to think about with a diagram.
By the way, a nifty dome calculator tool can be found here.
By the way, a nifty dome calculator tool can be found here.

I did this with an old math notebook and a shoddy compass I found in middle school; right now your drawing does not have to be the epitome of precision.
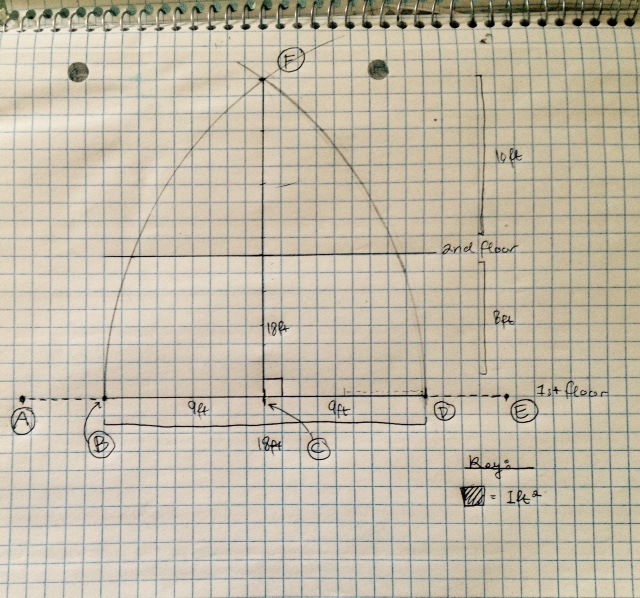
*Note: I despise scaling things, or using rulers in general. In this diagram, one unit of this graph paper is equivalent to one foot. (4 squares per inch of paper, so it's a 12:0.25 inch scale).
A- This point is 4.5 units away from point B, because 4.5 is half of my radius, which is 9 units.
B- This point is 9 units away from the center of the line; it is 9 units because that is half of the diameter, which is 18 units. If you are building a superadobe dome, you shouldn't go over a 20 ft diameter for safety reasons.
C- This is the center of my 18 unit line, so it bisects the diameter on the drawing.
D- See B.
E- See A.
F- This is the perpendicular bisector of your original diameter line, and it is 18 units tall. At its peak, your done will be as tall as it is wide. That is, the maximum height is equivalent to the diameter.

- Put the pointy end of your compass on point A, and the pencil end on point D. Keeping the pointy end still, rotate the pencil end until it goes through point F.
- Reposition the compass so that the pointed end is on point E, and the pencil end on point B, and again, rotate the pencil end until it goes through point F.
|
|
more math, if you are so inclined
https://www.desmos.com/calculator/8tnbubvrfd
That is the link to my graph of the basic dome structure. I haven't figured out how to graph a piece-wise function on a calculator, so bear with me, but I recommend using Desmos.com instead of your graphing calculator, as my TI-84 is worse than I am at graphing circles. The other great thing about Desmos is its usability; you can change the color of the lines, zoom with ease, and all you have to do is click on an intersection or point to find its coordinates. You will need all of these things! (Or at least I did...).
So, how does one graph his/her future dream house? We (as in the teacherly Royal "we") will refer to the picture diagrams from earlier in the article.
1. The function of a circle is as described below (I am still figuring out how to embed symbols D': ), so that r is the radius. This is different than the radius of your floor area,meaning it is not 9. It is the distance from point E to B, or from A to D, which in my case was 9 + 4.5 = 13.5.

The h and the k refer to the coordinate of the center of the circle you are graphing, (h,k). Since the the center of the circle is going to rest on the x-axis, your y-coordinate will be 0, and the x-coordinate will be your radius. For me, then, (h,k) would be (13.5, 0). Because the dome shape is formed by the intersection of two circles, the center of the other was (-13.5, 0).
Most functions are written as "y=", so all you have to do is subtract your (x-h)^2 on both sides and take the square root of that. Do that for both circles, and then lucky you, you get to make it look all pretty on an online graphing calculator!!! Color code those lines!!!
Most functions are written as "y=", so all you have to do is subtract your (x-h)^2 on both sides and take the square root of that. Do that for both circles, and then lucky you, you get to make it look all pretty on an online graphing calculator!!! Color code those lines!!!

2) To graph the outside of your dome, all you have to do is change the radii of your two circle functions. My dome is actually on the larger side, so I have decided to use 18-inch wide polypropylene tubing. That means that the filled bags should be about 13 inches, which is about 1.08 ft; of course, I didn't realize this for a while and made my measurements with an 18 inch wide filled tube. Anywayssss, all you want to do is convert the inches your filled bag is wide to feet, add that to the old radius, and then graph another set of circle functions using that radius.

I used an online graphing calculator because I could mark the points of intersection between the dome and the second-level floor, and easily adjust as necessary. See, I have no problem living in a tiny home because I myself am small, and would be quite happy with 6ft tall ceilings and tiny beds and no shower (that has nothing to do with being short, more about a lack of proper hygiene). But there are people within my circle of friends who are actually taller than 6ft, and it would be nice to know how much floor space they would actually have before hitting their heads and cursing all the vertically-challenged people of the world. SO, the orange line is 6 units above the loft floor, and there was a green line that was 6 units above the main floor, though it seems to have disappeared... And you see that the green line intersects the dome at x=4.11 units, which does exactly translate to feet but it is close enough, and you plug in into the equation Floor Area = x*x*pi, which is just a modified formula for the area of a circle. I think the tall people of the world can take the main room, their walking room in the loft seems grim.
For the heck of it (a.k.a procrastination) I calculated the volume of filled bags needed to build this one dome using integrals with the shell method, which is (2*pi) * (the integral of x * [(the outer function of the dome)-(the inner function of the dome)] from 0 to 18) and that came out to about 4591.30 cubic feet. Again, I haven't found any use for this process except for studying for the BC Calc AP.
To calculate the number of feet for which I would need to lay the polypropylene tubing, I used a summation formula that generalized the height of each roll to be about 6 inches, and ON AVERAGE, to be stepped in about 3 inches (0.25 feet) for every new row, for 36 rows. (You actually step the bags in more as the circumference decreases.) Since the largest radius was the 9-foot radius, the new radius would be (9-0.25*(the number of rows built)). Then you have to multiply that by 2*pi, as that is the formula for the circumference.

As usual, I am not so concerned with absolute accuracy because it is very difficult to find specific lengths of tubing for sale, and I'm probably going to have to purchase a 2000 yard roll no matter what. Which is good, because I am bound to screw it up and use extra bags, and if I do manage not to mess up too bad, I might be able to build another dome with the same roll. A+ for working with society and its bulk order system that often conflicts with small projects.
when you care about accuracy
A great way to make sure all your measurements check out is to build a to-scale model of your future dome home. You could build it out of cob, Play-doh, origami, intricately-woven tufts of hair, etc.
But you could also spend five hours designing it on OpenSCAD, and not have to leave the house. Best of all, you can always make changes to your design, and when you are finally satisfied (I don't think I ever will be) you can bug your teacher to print it out for you in 3D!!!!!!!!!!! (and then you have the entire RGB scale with which to color your design, hehehehehehehehehehe). You can download OpenSCAD here, and there are little Makerbot stores and colleges where you can pay to have your design printed in whatever medium you want, aside from cob, and a lot of other things...
But you could also spend five hours designing it on OpenSCAD, and not have to leave the house. Best of all, you can always make changes to your design, and when you are finally satisfied (I don't think I ever will be) you can bug your teacher to print it out for you in 3D!!!!!!!!!!! (and then you have the entire RGB scale with which to color your design, hehehehehehehehehehe). You can download OpenSCAD here, and there are little Makerbot stores and colleges where you can pay to have your design printed in whatever medium you want, aside from cob, and a lot of other things...

Creepy floating house
I still have to work on the general formula for making this dome, but in the mean time I just plotted individual trapezoids that make up the shape of the dome, took the difference of the inside and outside domes, and then rotated it around the z-axis. There is a nifty little OpenSCAD cheat sheet, which I think you will find if you just Google it. And if you are truly interested, below I have attached my design.
| main_earthbag_dome.scad |
| |||
and my favorite method...

Spending an entire Saturday bringing my designs to life on the Sims 3. My computer is growing obstinate in its decrepitude, and fights me every step of the way, but once it loads my game we can launch into some form of productivity where I can create an entire garden in a few hours. Yes, this did involve sacrificing one half of my (virtual) family and abandoning our home to move to an empty lot, but once I control-clicked away their emotions we got to work on the front yard. Also, it is difficult to make a dome in the Sims, so I did not pursue it; I only recommend this for working with interior decoration and things outside the house. I still don't know how to save screen-shots to my desktop whilst deep in the gaming realm, so here is an eerily realistic (I think) phone picture.
